Development of control system for parallel seam welder
Abstract: The composition principle and implementation method of the system are discussed. Make full use of the performance characteristics of the upper and lower position machines, customize the reasonable communication protocol, and realize the serial communication between the PC and the single-chip microcomputer. It mainly discusses the composition and programming method of each functional module of the lower computer.
Keywords: host computer communication protocol lower position machine stepper motor welding power
Parallel seam welders are used to package integrated circuit chips. At present, the equipment for packaging integrated circuit chips used in China basically comes from countries such as the United States and Japan, and the price is expensive. Therefore, it has far-reaching significance to make it localized and low in price.
1 The main components and functions of the system
The system consists of two parts: the upper computer (PC) and the lower computer (microcontroller). The hardware structure is shown in Figure 1.
The upper computer (PC) software is developed by visual programming language VB6.0, using Mscomm control to complete the data communication between PC and MCU, transmitting control information, status information and welding parameters; and using VB6.0 for various databases The ability to operate achieves the humanization of welding. The lower computer (microcontroller) receives the command sent by the PC through the serial interface, starts the working program, and controls 6 stepping motors (including two x-axis, one y-axis, two z-axis, and one rotation θ-axis). The angular displacement of the motor is converted into a linear displacement by the lead screw, which drives the welding electrode to run according to the designed trajectory, and transmits the current running state to the PC in real time. The main functions of the system are:
1 The upper computer monitors the working state of the lower computer in real time, controls the working process of the lower computer; sets the working parameters of the lower computer, receives and transmits data information, control information and status information; records the welding parameters of the historical chip. When the system is powered on again, the latest welding parameters are used as the default values ​​of the welding parameters; data processing is performed and the data and working status are displayed to guide the operation process;
2 The lower position machine controls the rotation of 6 stepping motors, finally controls the movement of the welding electrode; controls the welding power and realizes the intermittent control; realizes the fine adjustment of the welding electrode.
3 The accuracy of the direction of each welding axis of the system shall not be less than 0.1mm.
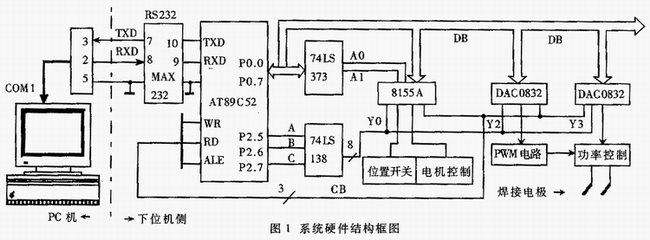
Figure 1 system hardware block diagram
2 System resource utilization and communication mechanism
2.1 Utilization of system resources
In order to make full use of the powerful data processing capability of the PC and the huge storage space, and effectively play the role of the data memory of the single-chip microcomputer, it is necessary to allocate system resources reasonably. One of the specific methods is that when the PC sends the welding data, the welding parameters stored in the floating point number are converted to the number of pulses according to the step angle of the stepping motor and the screw ratio. The second is the number of bits occupied by the number of pulses. Slightly larger than a single-byte integer multiple N bits, under the premise of satisfying the accuracy requirement: the transmitted data = the original data / 2n, then the transmission data is rounded, after the microcontroller receives the integer data, the left shift N bits Real data can be recovered. This not only improves communication efficiency, but also reduces the occupation of the microcontroller RAM.
2.2 System Communication Protocol
The baud rate is set to 4800 bps; the data frame structure is set to: start bit 1 bit, data bit 8 bit, stop bit 1 bit.
The information packet sent by the PC to the single chip microcomputer includes a data packet and a control information packet. The data information includes a structure starting with an "S" character followed by a 22-byte hexadecimal number. When sending, it is sent in ASCII format (text format), and 44 ASCII codes are actually sent. After the lower computer receives it correctly, it sends a “K†to the PC as an acknowledgment response signal. If the PC does not receive the "K" signal within the specified time, it will resend. If the three times are not successful, the display information is given on the screen. The PC must guarantee the packet length of 44 ASCII codes to avoid system malfunction. The control packet structure is: starting with an uppercase "O", followed by a single-byte hexadecimal control word, actually sending two bytes of ASCII code, also using "K" as the response signal, using the equal ratio code 3 /8. When sending, the high position is in the front and the low position is in the back.
The information received by the PC from the MCU includes the main contents of the structure as data information and status signals, and the data information and status information are simultaneously transmitted. This information is switched by "S", followed by 32 1-bit hexadecimal ASCII codes with "K" as the end signal. If the PC receives the complete packet sent by the MCU, there is a screen prompt to instruct the user to operate.
The above information consists of a mixture of double-byte numbers and single-byte numbers. The header and trailer of the packet are both non-hexadecimal ASCII characters to distinguish them. The receiver then unpacks according to the algorithm specified by the parties to the agreement, and the sender assembles the data according to the data structure specified by both parties.
3 The main components of the lower computer and design ideas
3.1 Modular Module
The hardware component of the communication module is made simpler by using a MAX232 completion level conversion function, eliminating the trouble of using a standard chip with ±12V to 15V, and the connection with the PC is the simplest. There is no need for a hard handshake, and a lot of work is done by software.
The main programming methods are as follows:
1 The lower computer receives the data packet sent by the PC, and receives it in an interrupt mode (and is set as an advanced interrupt) to meet the real-time requirement of the communication. Here only the execution of the receive interrupt service routine is triggered and the first byte is received. Once the interrupt routine is entered, the remaining bytes are received by the program query. The receiving flag RI is set by hardware and reset by software. After the data, the protocol specifies decoding and verification of the data, and returns the verification information to the PC. 2 The subroutine that sends the running status information to the PC by the lower computer is called according to the needs of the program working process. In order to ensure the logic clarity of the program during the calling process, the CPU shuts down the interrupt, and uses the program to query the sending flag TI (the use of TI is similar to RI), perform data conversion according to the protocol requirements and send a complete packet, and then make the CPU open interrupt. The entire program is executed.
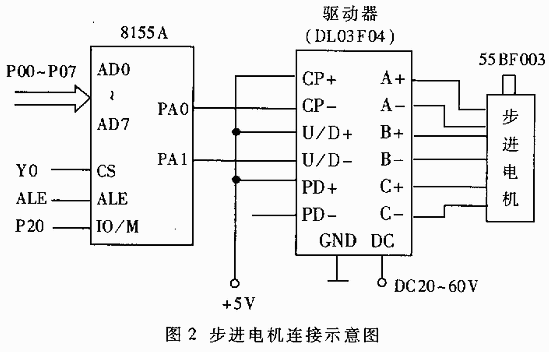
3.2 stepper motor control module
Stepper motors are one of the important actuators in mechatronic products. For three-phase reactive stepping motors, there are two ways of working. The system adopts three-phase single and double six-shot power-on mode. This method is not easy to lose step, and it is not easy to generate oscillation near the equilibrium position of the rotor. The stability of operation is good, and the precision of control is doubled. The operation of the motor is smoother and the control accuracy is higher. The system is controlled by a stepped motor driver with subdivision. The speed of the stepper motor depends on the frequency of the step pulse sequence. Its hardware interface circuit is shown in Figure 2. In the figure, only the connection diagram of the stepping motor on the left side of the X-axis is shown. The other motors are connected in the same way as the figure, but the other pins of the 8155A are used. The CP+ and CP- of the stepper motor driver are step pulse input terminals, U/D+ and U/D- are direction control inputs, and PD+ and PD- are offline control inputs (this system is not used), and each has The opto-isolated circuit is beneficial to the safety and reliability of the system. The common anode connection method is used because the current-carrying load capacity of the logic circuit is usually greater than the current-carrying capacity; DC and GND are the power terminals, and the DC is required. 20~60V, the current is 4A; the output terminals A+ and A-, B+ and B-, C+ and C- are respectively connected with the three-phase lead wires of the stepping motors A, B and C respectively. The control of the stepper motor mainly has logic control and speed control.
The logic control includes motor rotation direction control and transmission step pulse train. Since the PA port and the PB port of the access 8155 need to be performed in a byte manner, according to the rotation direction control and the need of the transmission of the step pulse sequence, two control words are logically set and reset, and are alternately output to the corresponding port, that is, Control of motor rotation is achieved. The system controls up to two motors to work simultaneously, with a total of 16 control words. The specific programming idea is: the pulse number is shifted from the step angle to the angular displacement, and then the pulse number is proportional to the line displacement.
The speed control is implemented by inserting a delay subroutine during the alternate output of the set and reset two control words, so the speed is determined by the execution time of the delay subroutine. In the low speed section of the motor operation of this system, the control line speed is 4mm/s during non-welding operation; the line speed is 1~8mm/s during welding operation, which is controlled by PC in real time according to needs.
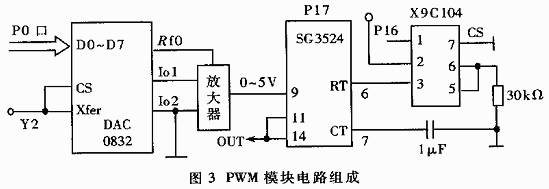
3.3 PWM module
In order to meet the technical requirements of IC chip seam welding, the power loading of the soldering process is required to be intermittent. For this purpose, a PWM pulse width modulation module is designed to realize intermittent control of power. Figure 3 shows the circuit components of this module. The core device is SG3524, its output is a periodic pulse sequence, its period is controlled by RT, CT terminal to ground access resistance RT and access capacitor CT, period T=0.77Rt×Ct, so the digital potential is serialized here. The X9C104 is used to control the T. According to the method of using the digital potentiometer in the figure, the expression of the resistance R is: R=(99-n)×100kΩ, where n is controlled by programming. The duty cycle of the output signal of the SG3524 is programmed by the D/A converter circuit. The system realizes T=40ms~80ms, and the duty ratio is 0~100%, which is controlled by the upper computer.
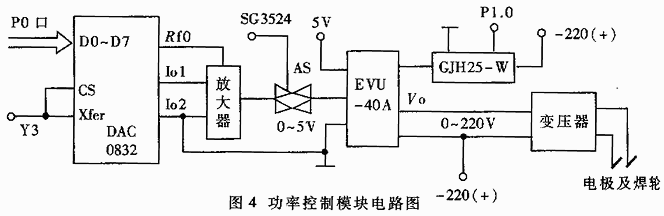
Figure 4 power control module circuit diagram
3.4 Welding function control module
The control of the welding power is actually achieved indirectly by controlling the output voltage. The digital signal is output from the single-chip microcomputer to the DAC0832 for digital-to-analog conversion. After the conversion result is controlled by the SG3524, the solid-state voltage regulation module EVU-40A is controlled to make the output AC voltage linearly proportional to the input digital signal. The output voltage is applied to the welding converter, converted to a low voltage and a high current is applied to the welding electrode, and the IC chip is seam welded by generating a high temperature. The implementation circuit is shown in Figure 4. In addition, due to the residual voltage in the actual operation of the EUV-40A voltage regulator module, the electrode welding wheel is sparked when the welding parameters are adjusted, resulting in unnecessary loss. Therefore, the input circuit of the voltage regulating module is connected in series with the AC solid state relay. GJH25-W is blocked.
The welding power module control folding programming method is as follows: the single chip receives the power control information of the upper computer and writes the DAC0832 chip with the address of 6000H, and the GJH25-W sends the effective control signal to make it conductive, and the welding electrode has the corresponding power output. Perform seam welding. When welding is not performed, the GJH25-W is turned off, and OFFH is sent to the DAC0832 to achieve a completely reliable disconnection of the solder.
4 Experimental test results
The linear displacement/angular displacement of the X and Y axis screws is 4 mm/360 degrees, the linear displacement/angular displacement of the Z axis screw is 1.5 mm/360 degrees, and the step angle is 0.36 degrees. The experimental method is to use a computer to send the number of pulses and calculate the theoretical value, and actually measure and calculate the absolute error value with a micrometer (see Table 1). The analysis results meet the design requirements.
Table 1 Experimental data test table

After a period of test operation, the system proves that the communication has good real-time performance and high control precision, which meets the design requirements.
Jewelry Hang Tags,Hang Tag,Clothing Hang Tags,Paper Hang Tag
Xing Hua Printing Factory , https://www.xinghuaprint.com